Webpack devServer
本文最后更新于:2022年4月22日 上午
devServer 可以帮助我们在本地起一个服务器来更便捷的帮助我们开发
前言
在我们开发 Vue 或者 React 项目时,当我们修改完某一行代码时,我们的项目无需重启浏览器便会自动刷新,为我们加载最新的代码
通常,这些功能都是脚手架帮我们完成的,如果我们需要自己也搭建一个这样的服务,就需要借助 webpack-dev-server,在某些地方也被简称为 WDS;
安装 devServer
npm i webpack-dev-server基本使用
在 webpack.config.js 中配置 devServer
webpack.config.jsconst path = require('path');
const HtmlWebpackPlugin = require('html-webpack-plugin');
module.exports = {
    entry: './src/main.js',
    output: {
        filename: 'bundle.js',
        path: path.resolve('./build'),
    },
    mode: 'development',
    devServer: {
        hot: true,
    },
    plugins: [
        new HtmlWebpackPlugin({
            template: './public/index.html'
        }),
    ]
}
package.json 中新增脚本
package.json"scripts": {
  "serve": "webpack serve",
},
运行以下命令
npm run serve
测试代码
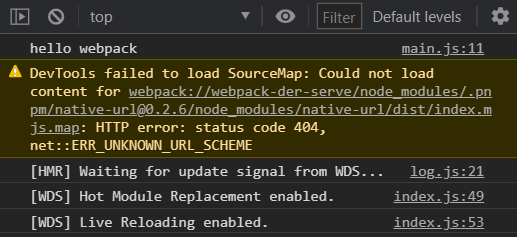
src/main.jsconsole.log('hello webpack');- 控制台即可看到我们的输出结果
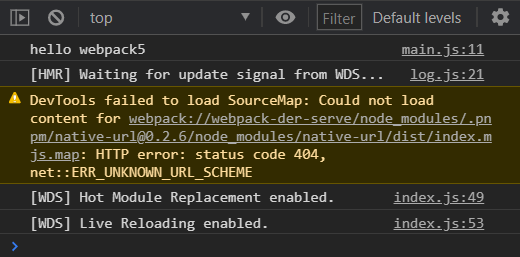
此时,我们修改一下输出内容@pmmmwh/react-refresh-webpack-plugin
src/main.jsconsole.log('hello webpack5'); 之后我们切换到浏览器,无需手动刷新,浏览器会自动加载我们刚刚修改后的代码
derServer 会帮我们把编译解析后的内容存在内存中,所以加载的时候很快
进阶使用
配置 Vue 模块热替换
如果我们不借助脚手架,也想在编写 vue 代码时可以模块热替换的话,我们可以借助 vue-loader, vue-loader默认已经帮我们开启了热重载
安装所需插件
npm i vue vue-loader vue-template-compilersrc/vueApp.vue<template>
<div>{{ message }}</div>
</template>
<script>
export default {
data() {
return {
message: "hello vue",
style:'hello wordle'
};
},
};
</script>
<style>
</style>src/main.jsimport Vue from 'vue';
import VueApp from './vueApp.vue';
new Vue({
render: h => h(VueApp)
}).$mount('#app');配置 webpack.config.js
webpack.config.jsconst path = require('path');
const HtmlWebpackPlugin = require('html-webpack-plugin');
const VueLoaderPlugin = require('vue-loader/lib/plugin')
module.exports = {
    entry: './src/main.js',
    output: {
        filename: 'bundle.js',
        path: path.resolve('./build'),
    },
    mode: 'development',
    devServer: {
        hot: true,
    },
    module: {
        rules: [
            {
                test: /\.vue$/i,
                use: 'vue-loader'
            },
        ],
    },
    plugins: [
        new HtmlWebpackPlugin({
            template: './public/index.html'
        }),
        new VueLoaderPlugin(),
    ]
}
重新执行以下命令
npm run serve既可在页面中看到以下内容

此时,我们修改一下文件内容
src/vueApp.vue<template>
  <div>{{ message }}</div>
</template>

<script>
export default {
  data() {
    return {
      message: "hello vue3",
      style:'hello wordle'
    };
  },
};
</script>

<style>
</style>
既可看到浏览器页面已经变成以下内容

配置 React 模块热替换
React 配置起来相对麻烦一些,需要借助以下两个插件
react-refresh@pmmmwh/react-refresh-webpack-plugin
安装所需插件
shellnpm i react react-dom react-refresh @pmmmwh/react-refresh-webpack-plugin @babel/core @babel/preset-env @babel/preset-react
src/reactApp.jsximport React, { useState } from 'react';

export default function App() {

    const [message, setMessage] = useState('hello react')

    return (
        <div>
            {message}
        </div>
    )
}src/main.jsimport React from 'react';
import ReactDom from 'react-dom'
import ReactApp from './reactApp.jsx'
ReactDom.render(<ReactApp />, document.getElementById('root'));webpack.config.jsconst path = require('path');
const HtmlWebpackPlugin = require('html-webpack-plugin');
const ReactRefreshPlugin = require('@pmmmwh/react-refresh-webpack-plugin')
module.exports = {
entry: './src/main.js',
output: {
filename: 'bundle.js',
path: path.resolve('./build'),
},
mode: 'development',
devServer: {
hot: true,
},
module: {
rules: [
{
test: /\.jsx?$/i,
use: 'babel-loader'
}
],
},
plugins: [
new HtmlWebpackPlugin({
template: './public/index.html'
}),
new ReactRefreshPlugin(),
]
}babel.config.jsmodule.exports = {
presets: [
['@babel/preset-env'],
['@babel/preset-react']
],
plugins: [
['react-refresh/babel']
]
}运行以下命令
shellnpm run serve
打开浏览器既可看到以下内容

此时,我们修改一下文件内容
src/reactApp.jsximport React, { useState } from 'react';

export default function App() {

    const [message, setMessage] = useState('hello react17')

    return (
        <div>
            {message}
        </div>
    )
}
既可看到以下内容

devServer 的其它配置
open: 可设置布尔值,项目启动后打开浏览器,vue脚手架默认关闭,react脚手架默认开启host: 配置需要使用的 host,如果需要配置成外部可以访问,可配置成'0.0.0.0'compress: 是否为静态文件开启gzip压缩,仅在开发阶段生效,部署阶段需要nginx配置才生效watchContentBase: 文件发生更改后是否重新加载整个页面contentBase: 配置静态资源提供的来源,并且会先读取output中的 path ,再读取devServe中的 contentPathuseLocalIp: 为配置是否可以通过本地 ip 来访问,react 和 vue 的脚手架默认配置为开启
webpack.config.jsconst path = require("path");
const HtmlWebpackPlugin = require("html-webpack-plugin");
const VueLoaderPlugin = require("vue-loader/lib/plugin");
const ReactRefreshPlugin = require("@pmmmwh/react-refresh-webpack-plugin");

module.exports = {
  entry: "./src/main.js",
  output: {
    filename: "bundle.js",
    path: path.resolve("./build"),

    // 当我们项目部署在非根目录时, 可以配置成 / 目录名 /  或者  ./
    // 表示从当前目录加载文件
    // publicPath: '/lfm/'
  },
  mode: "development",

  // 开发服务配置
  devServer: {
    // 热更新
    hot: true,

    hotOnly: true,

    // 配置路径
    // publicPath: '/lfm/',

    // 启动后默认打开浏览器
    open: true,

    // 默认是 localhost ,配置成 0.0.0.0 可以让外部服务器可以访问
    host: "0.0.0.0",

    // 表示开发时在硬盘同时写入一份,某些情况下方便我们调试
    writeToDisk: true,

    // 该配置使我们的项目可以使用本地ip打开,
    useLocalIp: true,

    // 开发监听端口
    port: 3000,

    // 配置是否打开 gzip 压缩
    compress: true,

    // 文件更改后是否重新加载整个页面
    watchContentBase: true,

    // 告诉服务器从哪里提供内容。只有在你想要提供静态文件时才需要。devServer.publicPath 将用于确定应该从哪里提供 bundle,并且此选项优先。
    // contentBase: path.resolve(__dirname, 'lfm')
  },
  module: {
    rules: [
      {
        test: /\.vue$/i,
        use: "vue-loader",
      },
      {
        test: /\.jsx?$/i,
        use: "babel-loader",
      },
    ],
  },
  plugins: [
    new HtmlWebpackPlugin({
      template: "./public/index.html",
    }),
    new VueLoaderPlugin(),
    new ReactRefreshPlugin(),
  ],
};
devServer 配置代理
后续当请求 /lfm/ 时会被代理到 http://localhost:8888
webpack.config.jsconst path = require("path");
const HtmlWebpackPlugin = require("html-webpack-plugin");
const VueLoaderPlugin = require("vue-loader/lib/plugin");
const ReactRefreshPlugin = require("@pmmmwh/react-refresh-webpack-plugin");

module.exports = {
  entry: "./src/main.js",
  output: {
    filename: "bundle.js",
    path: path.resolve("./build"),
  },

  mode: "development",

  // 开发服务配置
  devServer: {
    // 热更新
    hot: true,

    // 配置代理
    proxy: {
      "/lfm": {
        target: "http://localhost:8888",
        pathRewrite: {
          "^/lfm": ""
        },
        secure: false,
        changeOrigin: true
      }
    },
  },

  module: {
    rules: [
      {
        test: /\.vue$/i,
        use: "vue-loader",
      },
      {
        test: /\.jsx?$/i,
        use: "babel-loader",
      },
    ],
  },
  plugins: [
    new HtmlWebpackPlugin({
      template: "./public/index.html",
    }),
    new VueLoaderPlugin(),
    new ReactRefreshPlugin(),

  ],
};
本博客所有文章除特别声明外,均采用 CC BY-SA 4.0 协议,转载请注明出处。